TAG by Material
Often I will write all the notes I want on one elevation, and then copy and paste into the other elevations, and move around the arrows. That works fine, but what if some of the materials or descriptions change? I must admit, I also find this part of the job fairly dull and routine. What if I could also standardise this for my projects, so the notes were already written and ready to use?

I accidently discovered a different method.
In Revit, I know about Tags. I can tag doors, windows, and walls. That Tagging by CATEGORY. I also noticed there is a TAG by MATERIAL.
What is that?
The TAG by MATERIAL reads the "description" line in the material definition. The "description" is located on the IDENTITY tag under the Material Definition dialogue.
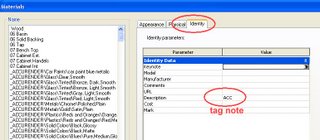
This means that the tag is reading the description on the material you are tagging. For example you may have a "weatherboard cladding" or "face brickwork". Perhaps "powdercoated alum framed window" or "painted timber post" or "colourbond metal roof sheeting".
All these notes can be "pre-built" into the material definition you assign to your walls, roofs, windows etc. Then just TAG with MATERIAL to get your notes on the drawings. For me, it's a bit more fun than the old way, and I can predefine my notes in my template file by setting up my material definitions.
It's possible to TAG with aleader and arrow, or to TAG without a leader and arrow.
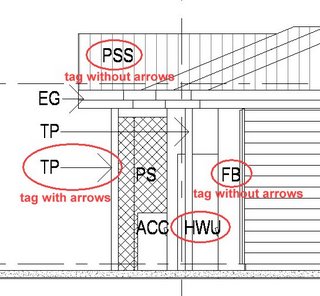
For this current project, we use codes on the drawings that are then referenced to a legend. This is a perfect use of TAG by MATERIAL. For long descriptions that would be word wrapped, the TAG by MATERIAL will not work, as it is just a one-liner.
Happy Tagging!
posted by phindes at
2:21 PM
4 Comments
![]()
![]()

